above is a link which is a step by step guide to the editing process which I found helpful.
On imovie you can add titles to your production which we used to have reviews, release dates and captions. We used these as they make it look more realistic as it is what you would expect to see on a real film trailer.
I found that you can change the speed, font, size and colour of the transistions. We decided to have our transistions red writing on a black background to convey a horror theme.
 We also used the video effects that imovie has to offer.
 You can add a soundtrack to imovie and you can either create your own original piece by using garage band, import the soundtrack from a CD, itunes libary or imovie has a selection of soundtracks you can add. After using garage band last year we decided we would download our music from a copyright free website.http://www.videocopilot.net/ You can add more than one track such as we have used a techno beat at first and then it changes into a slow paced to fit in with the narrative. There is also the option to start the soundtrack at any point of the production so we decided to start ours when the protagonist press 'play' on a CD player. You can control the volume of the soundtrack which we found useful so we can turn the volume down when there is dialogue which needs to be heard.
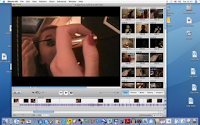 This is what imovie looked like for the majority of our editing. Underneath the main image is the timeline of the clips we had placed there for our trailer and underneath that is the music line. Down the right hand side is the clips that we havn't used in our trailer but have kept to use as roguh cuts or clips we had ' split' or had used initially but after audience feedback, changed them with something else.
 We added transistion throughout are trailer to create more variety to the clips. The 'wash in' transistion was used successfully when you see somebody cutting out a person from a photograph as it gave extra suspense to the shot. With the transistions you can decide what speed they appear at and if you don't like the clip you can easily remove it.
 When adding sound onto imovie you can chose the alter the volume levels of the music or a particular clip. It is simple to do and useful as you can chose to lower the music when you need to be able to hear what the characters are saying.
 The photo above shows when we 'extracted' the audio. We applied this tool in the bar scenes as the external sound is too loud and un-necessary. We also used it as a voice over when you see a close up of the protagonists face with the male characters voice played over. We used this as it is an effective way to show what the protagonist is thinking about and it adds more variety to the trailer then having a close up of the males face saying it.

We added titles to our production which included 'this christmas' (this was our release date as with teaser trailers they do not give a specific date) 'be prepared' and others. We used these as it gives exposistion to the narrative through text instead of having a character say it. We chose black and red as it goes with the Christmas idea, red also signifies blood and love while black signifies death. We were able to choose the font, colour, size and how the title appeared on the screen and the duration it stayed.
I found the advantages to using imovie are all the clips are filed together making it easy to access them and easily sift through which clips to use, this basic layout makes it easier for begginers to use.
We took the photo for the magazine and poster with a digital camera and uploaded it onto iphoto were we 'adjusted' the photo slightly to make the photo seem sharper and brighter to stand out more.

This was followed by adding text to the cover in a variety of colours, fonts and sizes to make it look more appealing.
No comments:
Post a Comment